
Structural Engineering design is an iterative process. Designs usually evolve from early stages (concept) right through to detailed construction drawings. Equally, Structural Engineers have different design tools to assist them in design at every stage in the process. One such tool is the span to depth ratio. It has its place in Structural design from concept phase and even towards the end of detailed design. So lets take a look at what span to depth ratios are and examples of span to depth ratios for slab and beam elements.
Span to depth ratios are guidelines which Structural Engineers adopt to assist in forming their structural scheme. They can be used in either buildings or bridges and are usually adopted to determine preliminary sizes for spanning elements such as slabs and beams.
This article will go through the following span to depth ratios. (Feel free to click on any of the links below to jump straight to the one that interests you)…
- Span to depth ratio for reinforced concrete slabs and beams
- Span to depth ratio for post-tensioned concrete slabs and beams
- Span to depth ratio for steel beams
A Warning for Using Span to Depth Ratios
Span to depth ratios can really unlock the keys to the Lamborghini and give Structural Engineers a quick way to assess preliminary depths of structural members. It is a great way to size structural members without getting your favourite FEA software booted up such as ETABS, RAM Concept, STAAD Pro or Robot (or your favourite pen and pencil! I highly recommend you use more hand calculations than software)…
However first a word of warning for span to depth ratios! These tables are intended to be a guide only for achieving a “ball park” figure for structural sizes.
The sizes generated from these span to depth ratio tables should always be verified by a detailed assessment performed by your friendly local Structural Engineer.
How to Use Span to Depth Ratios
There are first a few things which you need to understand before using span to depth ratios. First lets start with the SPAN…
The span of a beam or slab is the length of that element between its support points. For a simple beam element the span would be indicated as per the image below…

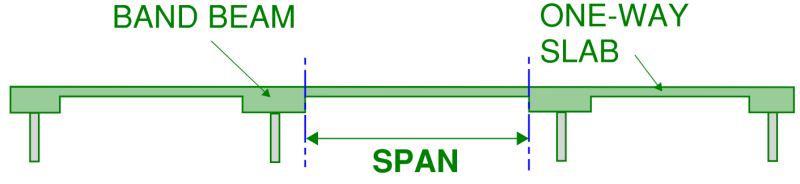
If the support point is very wide, the span can be reduced. An example of this is for a band beam system supporting a one-way slab. This type of structure is very common in Australia. It usually comprises a band beam supported by columns which is in the order of 300 to 700mm deep (11.8 to 27.5 inch) by about 2,400mm wide (94.5 inch).
A one way spanning slab usually runs between the band beams. For the sake of the slab, its span can be reduced due to the wide support beams. Here is what that arrangement would look like…
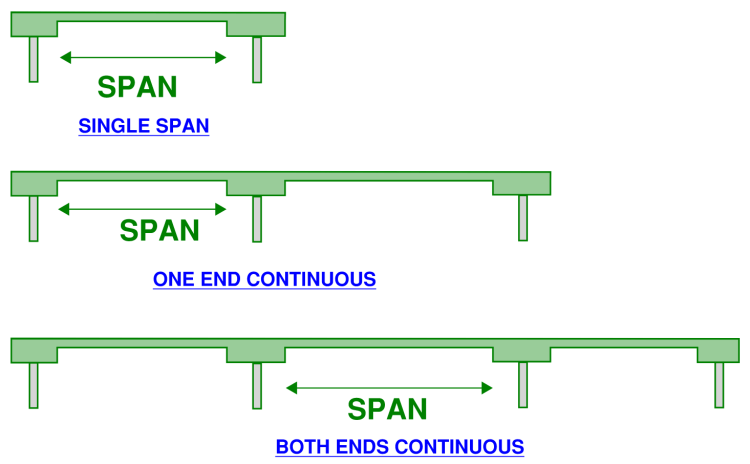
Continuity plays a major role in how a beam or slab performs. If a slab or beam runs “continuous” it is said to be structurally connected over two or more consecutive spans.
A single span member will deflect more compared to a continuous member if span, load and structural depth are all equal. The span to depth ratio tables in this article provide guidance on member sizes which are single span, continuous at one and and continuous at both ends. Therefore it is important to understand this concept also. Here is another series of images to explain this arrangement further…
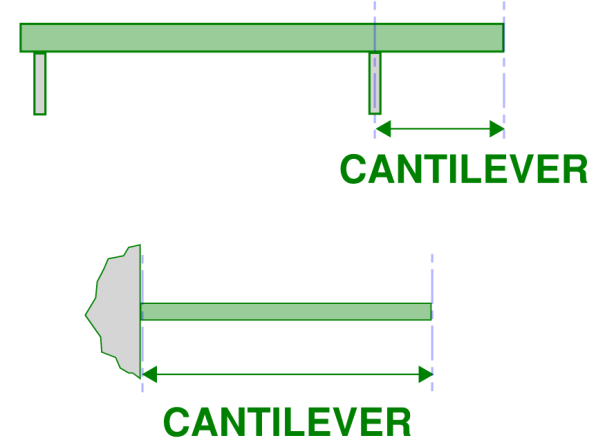
A cantilever beam or slab performs different again to a single span or continuous span. A cantilever beam or slab is one which has a fixed support (or close to fixed support) one one end and a free end on the other. Here are a couple of examples…
Now we are ready to take a look at some indicative span to depth ratio tables for different structural elements…
Span to Depth Ratio for Reinforced Concrete Slabs and Beams
Here are some things to keep in mind when using these span to depth ratios:
- These tables assume a Live Load of about 5kPa (0.73 psi).
- For loads around 10kPa (1.45psi) decrease the ratios by 10%
- For car parks, decrease the loading by 10% (assuming car park live load of 2.5kPa or (0.36psi)
- Reinforcement cover assumed to be 20mm for slabs (0.8 inch) and 50mm for beams (1.97 inch). Adjust accordingly if larger cover is required.
| Member | Single Span | One end Continuous | Both Ends Continuous | Cantilever |
| One-Way Slabs | L/22 | L/28 | L/33 | L/10 |
| Beams | L/12 | L/16 | L/20 | L/6 |
| Band Beams | L/15 | L/20 | L/25 | L/7 |
| Flat Slab | L/29 | L/35 | ||
| Flat Plate | L/27 | L/32 |
Span to Depth Ratio for Post Tensioned Concrete Slabs and Beams
Here are some things to keep in mind when using these span to depth ratios:
- These tables assume a Live Load of about 5kPa (0.73 psi).
- For loads around 10kPa (1.45psi) decrease the ratios by 10%
- For car parks, decrease the loading by 10% (assuming car park live load of 2.5kPa or (0.36psi)
- Reinforcement cover assumed to be 25mm for slabs (0.8 inch) and 50mm for beams (1.97 inch). Adjust accordingly if larger cover is required.
| Member | Single Span | One end Continuous | Both Ends Continuous | Cantilever |
| One-Way Slabs | L/28 | L/35 | L/40 | L/12 |
| Beams | L/15 | L/20 | L/25 | L/7 |
| Band Beams | L/18 | L/25 | L/30 | L/8 |
| Flat Slab | L/38 | L/45 | ||
| Flat Plate | L/33 | L/40 |
Steel Beams
Last but not least, here is a span to depth guidance table for steel support beams…
| Member | Span to Depth Ratio |
| Floor Beam | L/20 – L/23 |
| Roof Beam | L/32 – L/35 |
| Composite Beam | L/24 – L/27 |
| Plate Girder | L/10 – L/14 |
| Trussed Girder | L/6 – L/10 |
Good job